This is the multi-page printable view of this section. Click here to print.
Mod List Tweaks
1 - Power Attacking and Blocking
In this mod list, we use Dual Wield Parrying SKSE to modify our block hotkey to Mouse Button-4, and For Honor Power Attack to modify our power attack hotkey to Mouse Right-Click. Since not everyone may have a mouse with additional buttons, these may need to be changed. Below you will find instructions on changing your block key. If you want to change your block key back to the Mouse Right-Click, then you will need to remove For Honor Power Attack. This is currently unsupported.
Changing the Block Key
In the left pane of Mod Organizer, use the search bar at the bottom to search for “Dual Wield”. Double click the “Dual Wield Parrying SKSE” mod.
Click the “INI Files” tab at the top, and click the “DualWieldParryingSKSE.ini” file on the left tab.
You will need to set the “ParryKey” value to a number that corresponds to a key, mouse button, or controller button “Dec” value at this link. Do NOT set or use the “ParryKey2” value. Due to the below reason, you can only use one block key.
If you do change your block key, you will also need to change the block key in the Compatibility section of Valhalla Combat’s MCM. Dual Wield Parrying uses a different system to send the blocking action to the game, and Valhalla needs to know which key is initiating this separate action to properly start a timed block.
Changing the Power Attack Key
Please note that I cannot provide support if you decide to change your Power Attack key. Strange behavior can occur relating to power attacks not triggering as they should, where blocking happens instead. If you want to change your power attack key, you will need to follow the below steps;
Disable/uncheck the For Honor Power Attack mod in the left pane of Mod Organizer.
In game, open the Mod Configuration Menu, open the BFCO menu. Set the Power Attack Key (first option in the list) to your preferred key. This is set to SCRLK by default as it is an oft-used key.
To re-iterate, this will cause strangeness with blocking occuring when you try to power attack with this hotkey sometimes. I do not recommend you do so.
NEXT » Switching Interface Theme
2 - Switching Interface Theme
The mod list offers “Dear Diary - Dark Mode” as the default UI texture/sound overhaul.
If you prefer a lighter tone, we offer “Dear Diary - Paper UI” as an option that you can enable instead.
Follow the below steps to disable the default Dark Mode UI and enable the Paper version. All of these mods are grouped right next to each other in the mod list.
Disable the following mods in the INTERFACE AND CAMERA separator of the left pane of Mod Organizer;
- Dear Diary - Dark Mode
- Dear Diary - Dark Mode SkyUI Config
- Dear Diary - Dark Mode Compass Navigation Overhaul
- Inventory Interface Information Injector - Dark Mode
- Dear Diary Dark Mode C.O.C.K.S. Mode
- Custom Skills Framework Unified Menu - Dear Diary Dark
- The Dragonborn’s Bestiary - DDDM Patch
- QuickLoot IE - Dear Diary Dark Mode Reskin
- KIT SkyUI Config - Dark Mode
Enable the following mods in the INTERFACE AND CAMERA separator of the left pane of Mod Organizer;
- Dear Diary - Paper Mode
- Paper UI Sounds
- Sovngarde - A Nordic Font
- Inventory Interface Information Injector - Dear Diary Paper
- Dear Diary Light Skin for C.O.C.K.S
- Custom Skills Framework Unified Menu - Dear Diary Paper
- Dear Diary Paper - Experience Patch
- The Dragonborn’s Bestiary - Default Interface
- KIT SkyUI Config - Paper Mode
Keep in mind that the main menu will always use the Paper version of the UI via the “Dear Diary Main Menu” mod. Do NOT disable this mod. You do not need to worry about the plugin load order for any of these mods.
NEXT » Immersive Interactions for Quick Loot
3 - Immersive Interactions for Quick Loot
In this mod list, we use Immersive Interactions to add unique animations for a huge variety of interactions within the game. We also use Quick Loot IE, which allows you to loot containers, bodies, etc without opening the container menu. Due to this, Immersive Interaction’s animations will not play when looting via Quick Loot.
To remedy this, we use the mod “Immersive Interactions for Quick Loot”. This solves the above problem, while allowing you to back out of the animation quickly by moving forward or looting the container completely.
That being said, this behavior might be very annoying to certain players. I am well aware that many do not like Immersive Interactions at all. As such, you can safely disable “Immersive Interactions for Quick Loot” within the mod list. To do so, follow the below instructions;
Within the Left Pane of Mod Organizer, click the Filter text box at the bottom. Enter “Immersive Interactions for Quick Loot” without quotes.
Uncheck the mod that appears in the left pane, “Immersive Interactions for Quick Loot”
I recommend that you decide whether you want to use this mod before starting a playthrough, but you can safely disable it during a playthrough. You should NOT disable the full “Immersive Interactions - Animated Actions” in any event.
You can safely modify the Mod Configuration Menu for “Immersive Interactions - Animated Actions”, to disable a wide variety of the default animations that play in game.
NEXT » Survival Mods - Optional Feature
4 - Optional Features
4.1 - Survival Mods
Always remember that the list was not created around these, and they do not create my desired gameplay. They exist as an option so users that want that gameplay can still receive official support. These mods are entirely optional, and are not how I personally prefer to play the list.
If you make a support thread in Discord/post an issue on our tracker while using these Survival mods, please make note of that in the request :)
Enabling Survival Mods
Perform the following steps to enable the enhanced Survival mods that are offered as an option with this list.
1. Go to the “SURVIVAL MODS (OPTIONAL)” separator in the left pane of Mod Organizer, near the top of the list.
2. Enable ALL (no exceptions!) of the mods located under this separator. All of them will be disabled by default, and appear like the following;

Read the notes by hovering over the Notepad on each mod, to see any extra information.
3. Make sure the enabled plugins (all of them are below Occlusion.esp) follow the order in the following image. Campfire.esm will have automatically jumped to the top of the load order. You can leave it where it landed.
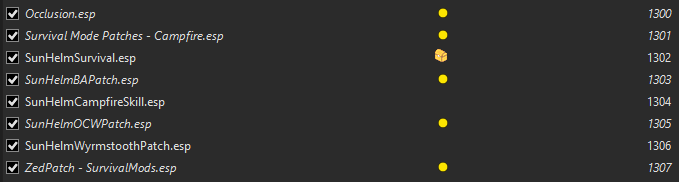
When you load a new game, the MCM for SunHelm will be automatically configured, and the mod enabled. However, the MCM for SunHelm will not update until you open the MCM menu at least once. After you have loaded into the game and your notification messages have ceased, open the Mod Configuration Menu, open the SunHelm MCM, and close it.
Keep in mind, that if you are enabling these Survival Mods on an existing playthrough, you will NEED to enter the MCM Recorder MCM menu, and manually re-run the
NEXT » ENB - Optional Feature
4.2 - ENB
This modlist uses Community Shaders by default. This suite of mods provides an extremely modern look to the game, while delivering a smaller performance hit than ENB. Previously, this modlist used ENB as a default, however the switch was made to CS recently.
If you have not used modern Community Shaders, I implore you to try it out! Relatively recent updates have brought the visuals to a level comparable to ENB, with many areas exceeding ENB. The performance gains must also be considered. We are playing a game, after all!
If you do decide you wish to switch to ENB, this modlist does provide multiple optional ENB presets. Below are instructions on disabling Community Shaders and using ENB.
Disabling Community Shaders
Note: If you are using Frame Generation Mods, ensure that you are using the correct version after switching to ENB!
Scroll to the very top of the left pane of Mod Organizer, and select all of the mods within the COMMUNITY SHADERS separator.
Scroll all the way to the bottom of Mod Organizer’s left pane. Double click the Overwrite “mod” at the absolute bottom.
Highlight the ShaderCache directory, and delete it. Ensure that it is no longer in the list of files within Overwrite.
With the above steps, Community Shaders is disabled. To enable ENB, follow the below steps.
Enabling ENB
All of the mods in the ENB (OPTIONAL) separator have notes attached to them, which can be viewed by hovering over the notepad icon associated with that mod. These notes further reiterate what is on this page, but also contain more information. Be sure to read these!
Scroll to very top of the left pane of Mod Organizer, and expand the collapsed-by-default ENB (OPTIONAL) separator, underneath Community Shaders.
Enable the ENBSeries Core mod. This must always be enabled when using ENB.
If you are using ENB Preset - Silent Horizons 2 - Universal Core, you MUST enable the KiLoader for Skyrim mod. If you are not using this preset, DO NOT enable KiLoader for Skyrim. The other two presets do not require anything except for ENBSeries Core to be enabled.
Optionally, click on the Filter option for the left pane of Mod Organizer, and search for
[ENBLight]. Enable all of the mods that start with[ENBLight]. You may need to expand the collapsed “ENB LIGHT (OPTIONAL)” separator.
- This is an optional feature, ENB light can enact a larger performance hit in certain locations, but I do recommend using it if you are going to use ENB.
Ensure that you only have one preset enabled at a time
If you have already enabled ENB are switching back to Community Shaders, click on the Filter option for the left pane of Mod Organizer, and search for [ENBLight]. Disable all of the mods that start with [ENBLight]. You may need to expand the collapsed “ENB LIGHT (OPTIONAL)” separator.
- It is very important that these are disabled when Community Shaders are in use. They are disabled by default.
NEXT » Frame Generation - Optional Feature
4.3 - Frame Generation Mods
This modlist offers an optional Frame Generation features for both Community Shaders and ENB, if you choose to use it. This can allow you to get quite a boosted framerate.
However, using it REQUIRES that your graphics card supports DirectX 12/DX12, otherwise the plugin will automatically unload. These mods are disabled by default. If you wish to use either, you will need to manually enable it in the mod list. DO NOT enable more than one!
In the left pane of Mod Organizer, use the Search bar near the bottom-middle of the screen, and enter “frame generation”.
In the filtered results near the top left, enable either the “Community Shaders - Frame Generation (Doodlum)” mod, OR the “ENB- Frame Generation (Doodlum)”. DO NOT enable both of them! By default, this mod list uses Community Shaders, so you should use the Community Shaders version unless you have specifically enabled ENB.
You MUST also enable the “SSEDisplayTweaks INI - Frame Generation” mod, located directly underneath the two Frame Generation mods. DO NOT skip this!
If you do not have a graphics card that supports DirectX12 / DX12, DO NOT use any of the above instructions!
NEXT » Controller Setup - Optional Feature
4.4 - Controller Setup
With this mod list, you are able to use a controller and access nearly all of the required keybinds through the use of a few optional mods. You shouldn’t have any issues performing this process on existing saves.
Switching to Controller
Follow these steps to switch from Keyboard and Mouse to Controller;
In the left pane of Mod Organizer, scroll all the way to the bottom, and find the “CONTROLLER SETUP (OPTIONAL)” separator. You will find three mods in this separator.
DISABLE the “Keyboard Keybinds” mod, and ENABLE the “Gamepad Plus Plus” and “Complete Controller Setup” mods.
Leave the MCM Recorder preset mods untouched.
At this point, you should load the game, and load into your save. Then, follow the below instructions
Open the pause menu, and navigate to Controls. Reset your controls to default (key/button to do so is shown at the bottom of the GUI)
Open the MCM menu named MCM Recorder, and click on the “AurbaesenceController” preset. Use the Run option, then close the MCM.
Re-open the MCM, open the Gamepad++ MCM menu. Navigate to Presets & Info > Load Preset > Aurbaesence. After selecting Aurbaesence, close the MCM menu completely.
Re-open the MCM menu, and open Gamepad++ once again. Open the Keys & Settings page, press OK to the prompt, then close the MCM menu. If you don’t see a prompt, simply close the MCM menu.
Confirm that the the controller bindings are working as listed on the bindings documentation. Now, you are ready to use your controller!
Switching back to Keyboard/Mouse
If you wish to move back to the keyboard primarily, you must follow the below steps;
In the left pane of Mod Organizer, scroll all the way to the bottom, and find the “CONTROLLER SETUP (OPTIONAL)” separator. You will find three mods in this separator.
ENABLE the “Keyboard Keybinds” mod, and DISABLE the “Gamepad Plus Plus” and “Complete Controller Setup” mods.
In game, open the MCM menu, then open the MCM menu named MCM Recorder, and click on the “AurbaesenceKeyboard” preset. Use the Run option, then close the MCM.
This will return the keybinds to their original state.